Max Out Space – Turn Your HQs Into a Defensive Wall!
Sometimes the best defense isn’t a stronger army. It’s making your enemy drive forever.
Welcome to another lunA toOnS lesson, where Albie proves that even a Lunatic can occasionally come up with a brilliant military strategy.
Today, we’re talking about HQ placement. Not because we want our alliance to look neat and organized (let’s not get carried away), but because the right formation can turn an entire area into a nightmare for enemy attackers.
And the secret? Just two little hexagonal fields.
The Real Goal: Deny Enemy Teleportation
In Last Z, positioning can be just as important as raw power.
When an enemy attacks, getting close to the target is a massive advantage. If they can teleport directly into your formation, their troops have only a short distance to travel.
But what happens when there’s nowhere to teleport?
They have to approach from farther away. Their troops spend much more time traveling, giving defenders a significant tactical advantage.
That’s exactly what our HQ formation is designed to achieve.
Step 1 – Place Your First HQ
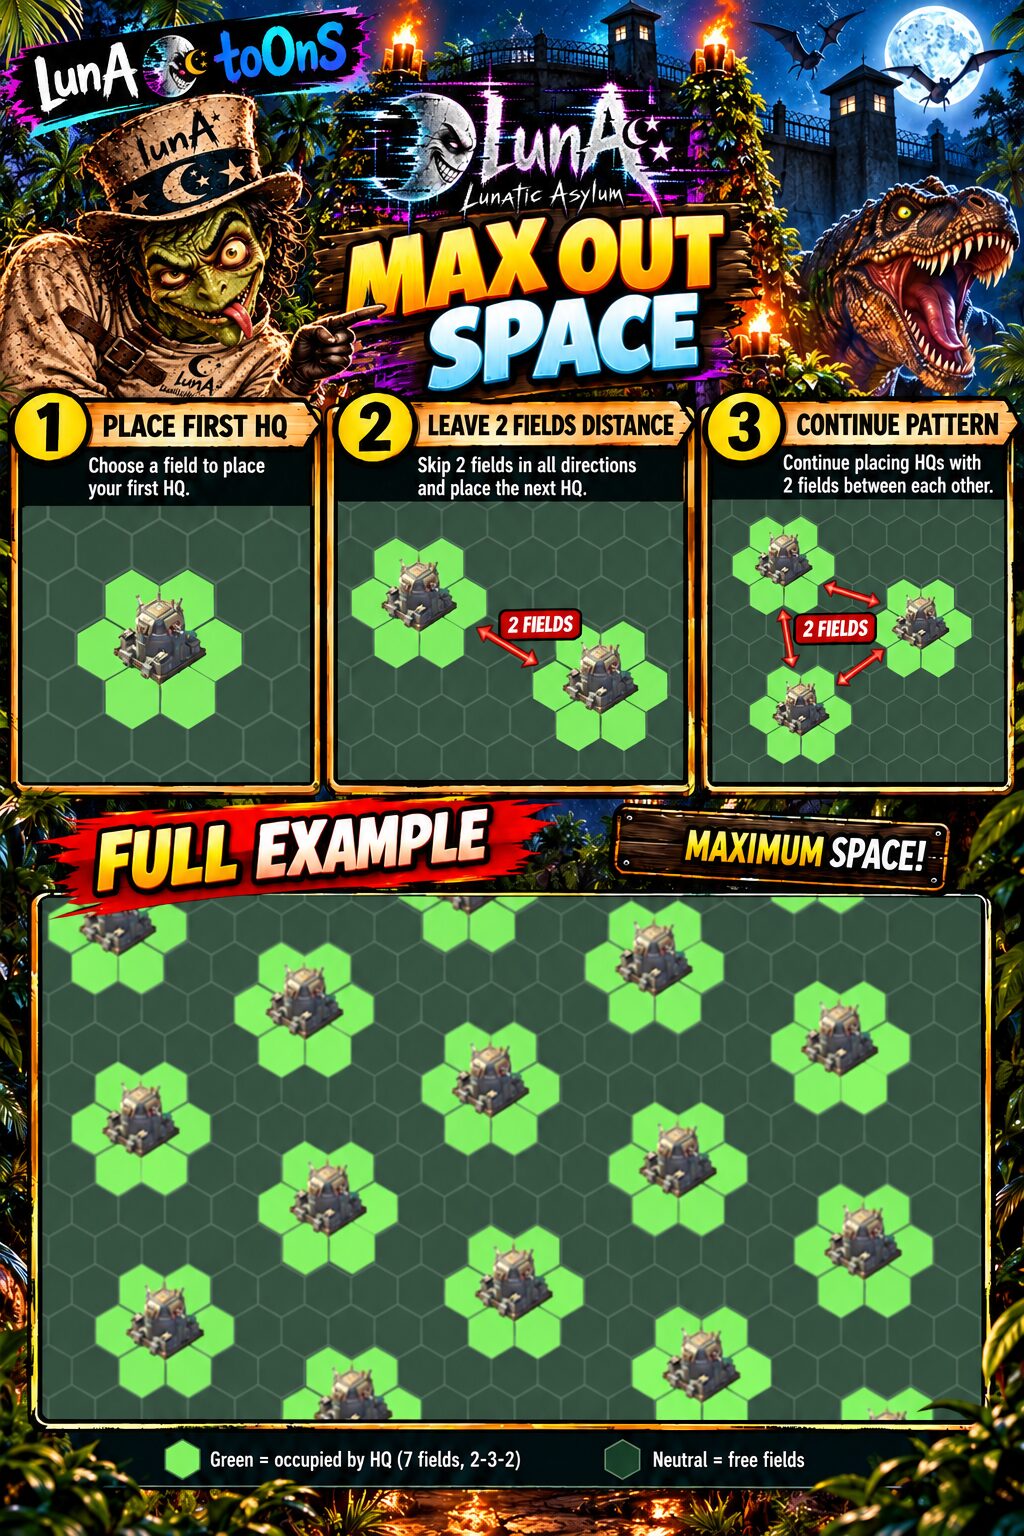
Every HQ occupies seven hexagonal fields in a 2–3–2 arrangement.
Choose your starting position carefully. This HQ becomes the reference point for the entire defensive formation.
Step 2 – Leave Exactly Two Fields
Place the second HQ according to the hexagonal grid, leaving exactly two free fields between the occupied areas.
Why two?
Because these gaps are too small for another HQ to fit into. That means enemy players cannot simply teleport into those spaces.
The important detail is the positioning: HQs must follow the staggered pattern shown in our infographic.
Step 3 – Continue the Defensive Pattern
Now add the third HQ and continue the same formation.
Maintain the exact spacing and staggered alignment. The goal is to create a large, connected area in which the remaining gaps are too small for enemy HQs to occupy.
A random collection of HQs won’t achieve the same result. The formation only works when everyone follows the pattern.
The Ultimate Example: Defending the Capital
Imagine an SvS battle around the Capital.
Our alliance occupies the grass surrounding the battlefield. Every member is positioned according to the formation, and every HQ is protected by an active shield.
Now the enemy arrives.
They want to teleport close to the Capital and launch their attacks immediately.
There’s just one little problem.
No room.
Our shielded HQs occupy the available positions, and the two-field gaps between them are too small for enemy HQs.
Instead of teleporting directly next to their target, attackers must find a position farther away.
And then comes the long drive.
Every attack takes additional travel time. Every troop movement becomes more inconvenient. Quick attacks become harder to execute, and the defenders gain precious time.
Even Whales Can’t Buy a Shorter Road!
We all know those players who seem to have unlimited resources, enormous formations, and enough power to flatten half a server.
The Whales.
In a direct fight, they can be terrifying. But raw power doesn’t automatically solve a positioning problem.
If they cannot teleport close enough, their troops still have to travel the distance.
A properly organized, shielded HQ formation can therefore help a coordinated alliance defend against opponents who are individually much stronger.
You don’t always have to defeat the Whale. Sometimes you just have to make him drive.
And drive.
And drive.
Albie recommends bringing snacks.
Important: The Formation Must Be Complete
This strategy depends on teamwork.
One badly positioned HQ can create an opening. One missing shield can compromise an otherwise protected position. And one member teleporting away at the wrong moment might give the enemy exactly the space they were looking for.
That’s why everyone needs to follow the same layout, maintain the required shields, and coordinate any relocation with alliance leadership.
The infographic shows the exact placement pattern. Use it as your reference rather than guessing the distances.
Max Out Space – Control the Battlefield!
The purpose of this formation isn’t simply to save space.
It’s to deny the enemy space.
By occupying strategic territory with correctly positioned, shielded HQs, we force attackers to operate from less convenient locations and increase the distance their troops must travel.
In a major battle, that can make a tremendous difference.
Power wins fights. Positioning helps win battles. And teamwork can make even the biggest Whale wish he’d stayed home.
Two fields. No teleportation gaps. Long enemy marches.
— Albie, Chief of Strategic Traffic Jams, lunA Lunatic Asylum